Lilith and Mordecai – MCM May 2016

Heyya everyone!

Sorry once again for the silence,  I get so distracted working on my costumes, caring for my Nan, wedding planning and updating my Instagram, that I keep forgetting to update my blog!
That changes now, for reals!

Since my last post was about the lead up to MCM in May, I’ll start there. My Lilith cosplay was updated for the event, and I finished my Mordecai commission for my client.
MCM was great fun as usual, and I got a brilliant shot of our two costumes together, taken my by Fiancee.

Made with Repix (http://repix.it)

The highlight of our day was when Jason Liebrecht stopped us for pictures, and said that Karl was the best Mordecai he had ever seen! I was beyond proud!

I hope to organise a photoshoot with these costumes at the beginning of next year some time, and will keep you all updated when the images will be posted!

Much Love,

Sabrina
xXx

Mordecai Costume Commission – Update 2

Heyya Everyone!

In my last update, I showed you all how I created Mordecai’s shoulder armour, leather vest and red body straps. Since then, I have got all of the cell shading done on the red straps and on the armour piece – and they look so great!

Processed with MOLDIV

For Mordecai’s trousers I created a pair of combat trousers, cell shaded along all the seams and added highlights to make them look creased and crumpled – just like how Mordecai’s look. To keep them as comfortable as possible, I decided to create the knee brace on his left leg using just fabric paint. I used various tones and shades of brown, white and black, to make trick the eye into seeing it as a raised, 3D piece.

Processed with MOLDIV

My next big job within this commission was Bloodwing. I adore Bloodwing and think she looks incredible – I was so excited to recreate her! I used thick wire to make an armature and fleshed it out with newspaper, to ensure it remained as light as possible. Once fully fleshed out, I covered her in multiple layers of paper mache to ensure she was strong and could withstand a blow (I’ve found that people at conventions don’t tend to value personal space, or the hard work that goes into costumes and props). To create the beak I used polymer clay and carved the holes and grooves into it to make it the perfect shape – this was then attached to the head and the seams covered with paper mache. All the details were added on with foam, and canvas fabric was used to make the wing membrane. Once fully dry, the bird was primed, sanded and then painted using acrylic paint. When dry, the cell shading was dry brushed onto the wings and body. As I wanted Bloodwing to stand up on her own, and not need to be held all day by my client, I decided to create a bracer and attached her feet onto it – once this was laced up, it would hold Bloodwing in place on his forearm. I used acrylic paint to paint her and add the cell shading, using in game screenshots to ensure I had her the exact right colours. Once the body was painted, I glued her feet to the bracer, then painted the legs. The bracer was then given a layer of brown spray paint, and cell shaded to fit the borderlands look.

Processed with MOLDIVProcessed with MOLDIV


The final part was to attach the red cell shaded strips onto the dreadlocks I created. This would complete Mordecai’s look, tying everything together. I used acrylic paint to add cell shading onto the dreadlocks, and the costume was complete!

Processed with MOLDIV


If any of you are heading to MCM London on the Saturday, keep an eye out for Karl in this Mordecai costume!

Much Love,

Sabrina
xXx


Mordecai Cosplay Comission – Update 1

Heyya Everyone!

Thought I would post a quick update on how my Mordecai cosplay commission is coming along. I’m so excited to have been commissioned for another Borderlands costume, as I love the art style of the games, and creating real life versions of the costumes are a lot of fun. Creating the cell shading on clothing, whilst being incredibly time consuming and at some times tedious, is always worth it as the end effect is striking and eye catching. I thoroughly enjoyed creating the costumes of Lilith from Borderlands 2 for myself, and Maya as a commission for a close friend; plus they had a fantastic reception at MCM London October 2014, especially at the 2K booth where we were mistaken for staff and asked for numerous pictures. And as a thank you for helping them promote Borderlands: The Pre-Sequel and our characters at their booth, albeit unintentionally, we were given a lot of free Borderlands merchandise which was amazing, and the team were so enthusiastic and friendly.


My Lilith cosplay – MCM London October 2014

——————

As I had been using a lot of Worbla recently on other costumes, I decided to start by making the shoulder armour piece Mordecai wears. After measuring my client to get every measurement required, I made a base from foam, covering it in Worbla for strength. After priming and sanding, I spray painted it with a matte grey spray paint – and attached the added details.

   Processed with MOLDIV

Processed with MOLDIV

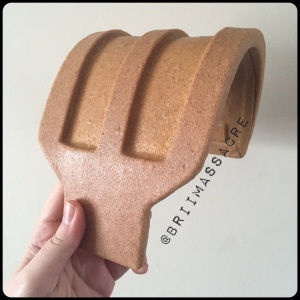
 In the next few days I will be finishing off the cell shading on the armour piece, and give it a coat of sealant to complete it.

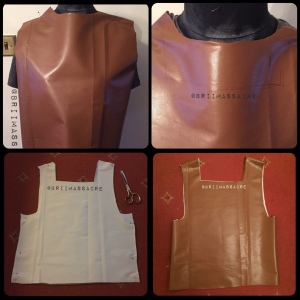
After creating the shoulder piece,  I moved onto the top, vest and straps that Mordecai wears. I used a grey T-shirt as the base for the top, everything would be stitched onto this. I’ve used a brown faux leather for the the vest, adding all the cell shading onto it with fabric paints.
The straps were made from red cotton fabric, cut into 2 inch wide strips. The cell shading was done using the same fabric paints used on the leather for the vest.

         Processed with MOLDIV  Processed with MOLDIV

Processed with MOLDIV

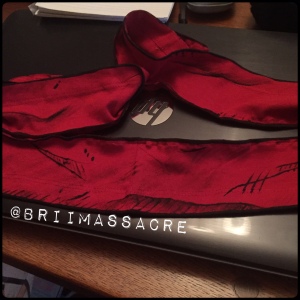
I still have to add cell shading highlights to both the vest and the straps, then they will be complete.

Hope this has been useful to some of you, if you would like any more information regarding the costume, message me 🙂 I’m happy to help! I will be uploading a full walkthrough/tutorial page for this costume once it is completed.

Much Love,

Sabrina
xXx